iReasoning MIB Browser is a desktop tool for managing SNMP-enabled devices and applications. It loads standard and proprietary MIB modules, tolerates some malformed MIB files, runs SNMP queries and updates, visualizes device data, and processes incoming notifications through a built-in Trap Receiver and rule engine. It is powered by the iReasoning SNMP API.
Major features
- An intuitive desktop interface
- Complete SNMPv1, SNMPv2c, and SNMPv3 support, including USM and VACM
- SNMPv3 security algorithms including HMAC-MD5, HMAC-SHA1, HMAC-SHA2, CBC-DES, 3-DES, CFB128-AES-128, CFB128-AES-192, and CFB128-AES-256
- A robust SMIv1 and SMIv2 MIB parser
- IPv6 support
- A Trap Receiver with rules, delayed or cancellable actions, and password or OAuth email forwarding
- An SNMP trap sender
- Application and SNMP packet logging
- Table view for MIB tables
- SNMPv3 USM user management
- Port view for network interface cards
- Switch port mapper for mapping switch ports
- Performance graphs for numeric OID values
- Device snapshot
- Cisco device snapshot
- Ping and traceroute tools
- Network discovery tool
- SNMP agent comparison
- Bookmarks
- Support for Windows, macOS, Linux, and other UNIX platforms
Requirements
- Windows, macOS, Linux, or another supported UNIX platform.
Download and run MIB Browser
- Download the appropriate MIB Browser installer or archive. On Windows, run setup.exe. On macOS, Linux, or another UNIX platform, use the package provided for that platform or extract the archive to the directory of your choice.
-
Start the application:
- Windows: Open MIB Browser from its application shortcut.
-
Linux: A DEB or RPM installation adds iReasoning MIB Browser to the
desktop application menu. It can also be started from a terminal with
ireasoning-mibbrowser. For a ZIP installation, open the MIB Browser installation directory and run browser.sh. -
macOS 10.8 or later: Download mibbrowser.pkg, then install it in
/Applications from Terminal:
On earlier macOS versions, extract mibbrowser.zip, open the ireasoning/mibbrowser directory, and run browser.sh.sudo installer -store -pkg mibbrowser.pkg -target /
Linux DEB and RPM packages
Native Linux installers are available for Professional Edition and for paid and evaluation Enterprise
Edition. Choose the package format and architecture for your system: Debian and Ubuntu use
amd64 or arm64 DEB files; Fedora, RHEL, Rocky Linux, AlmaLinux, and compatible
distributions use x86_64 or aarch64 RPM files. The package filenames do not
contain a product version; the complete version and release remain available in the package metadata.
Install an Enterprise package on Debian or Ubuntu:
sudo apt install ./ireasoning-mibbrowser-enterprise_amd64.deb
sudo apt install ./ireasoning-mibbrowser-enterprise_arm64.deb

# Enterprise Evaluation Edition
sudo apt install ./ireasoning-mibbrowser-enterprise-eval_amd64.deb
sudo apt install ./ireasoning-mibbrowser-enterprise-eval_arm64.deb
Install an Enterprise package on an RPM-based distribution:
sudo dnf install ./ireasoning-mibbrowser-enterprise.x86_64.rpm
sudo dnf install ./ireasoning-mibbrowser-enterprise.aarch64.rpm

# Enterprise Evaluation Edition
sudo dnf install ./ireasoning-mibbrowser-enterprise-eval.x86_64.rpm
sudo dnf install ./ireasoning-mibbrowser-enterprise-eval.aarch64.rpm
Install Professional Edition:
# Debian or Ubuntu
sudo apt install ./ireasoning-mibbrowser-professional_amd64.deb
sudo apt install ./ireasoning-mibbrowser-professional_arm64.deb

# Professional Evaluation Edition
sudo apt install ./ireasoning-mibbrowser-professional-eval_amd64.deb
sudo apt install ./ireasoning-mibbrowser-professional-eval_arm64.deb

# Fedora, RHEL, Rocky Linux, AlmaLinux, or a compatible distribution
sudo dnf install ./ireasoning-mibbrowser-professional.x86_64.rpm
sudo dnf install ./ireasoning-mibbrowser-professional.aarch64.rpm

# Professional Evaluation Edition
sudo dnf install ./ireasoning-mibbrowser-professional-eval.x86_64.rpm
sudo dnf install ./ireasoning-mibbrowser-professional-eval.aarch64.rpm
The native packages install a desktop application-menu entry and the
ireasoning-mibbrowser command. They do not place a shortcut in each user's Desktop folder.
Run the GUI as the logged-in user, without sudo. Professional Edition is a desktop application
and does not install a system service.
Start the GUI after installing a Linux package
- Open the desktop's application menu or launcher. Search for iReasoning MIB Browser, then select it. Depending on the desktop, the launcher appears under Network or in the general application list. If a desktop session does not display a newly installed launcher immediately, sign out and back in, or use the terminal command below.
-
Alternatively, open a terminal and run:
The package installs this command asireasoning-mibbrowser/usr/bin/ireasoning-mibbrowser, so it can be run from any directory. Do not usesudo; the GUI creates configuration and log files for the current user. - With Enterprise Edition, the GUI connects to the local Enterprise server that the package starts as a system service. To use a server on another computer, open File > Server Address and enter that server's address. The Professional package starts only the desktop application and has no server service.
A ZIP installation does not add the menu entry or terminal command. Extract it, change to its installation
directory, and run ./browser.sh instead.
Enterprise Edition
Enterprise Edition can run the Trap Receiver and Watches as a system service. A Watch can send email or SNMP traps when a MIB object crosses a configured threshold.
On Windows, the service starts automatically. The macOS Enterprise PKG installs the server as the system service com.ireasoning.mibent; it starts when installation finishes and at every system boot, before a user logs in. Linux Enterprise DEB and RPM packages install, enable, and immediately start ireasoning-mibbrowser-enterprise.service. Enterprise ZIP installations do not install a service; configure the operating system to run $INSTALL_DIR/lib/runserver.sh at startup when automatic startup is required.
On macOS, inspect or restart the service from Terminal with:
sudo launchctl print system/com.ireasoning.mibent
sudo launchctl kickstart -k system/com.ireasoning.mibent
On Linux, administer the native Enterprise service with:
sudo systemctl status ireasoning-mibbrowser-enterprise.service
sudo systemctl restart ireasoning-mibbrowser-enterprise.service
sudo systemctl stop ireasoning-mibbrowser-enterprise.service
sudo journalctl -u ireasoning-mibbrowser-enterprise.service
The Linux Enterprise application is installed under /opt/ireasoning/mibbrowser. Mutable server
configuration, database, MIB, and license state is stored under /var/lib/ireasoning-mibbrowser,
and logs are stored under /var/log/ireasoning-mibbrowser. Upgrades and reinstalls preserve these
locations, including when upgrading from an evaluation package to the paid package. Removing the package
removes its application and service unit but leaves server state and logs in place.
The Enterprise Java GUI runs separately as the logged-in user and stores its client state under
~/.imibrowser. Existing ZIP installations are not migrated automatically; stop both servers
before manually copying mutable data from a ZIP installation.
Installed files, configuration, logs, and uninstalling
MIB Browser keeps packaged program files separate from mutable configuration and logs where the platform installer supports that separation. Back up configuration, licenses, custom MIBs, and database contents before uninstalling or manually deleting data directories.
Linux
| Location | Contents |
|---|---|
/opt/ireasoning/mibbrowser |
Packaged application, bundled Java runtime, libraries, documentation, images, and launch scripts. |
/usr/share/ireasoning-mibbrowser-enterprise/defaults |
Read-only Enterprise defaults used to initialize missing server state. |
/var/lib/ireasoning-mibbrowser |
Mutable Enterprise server state. Configuration files are in config/, including
mibbrowser.xml, trapd.xml, and web.properties. The
database/ and mibs/ directories and license state are also kept here.
|
/var/log/ireasoning-mibbrowser/server.log |
Enterprise server application log. Service console output is also available through Journal. |
~/.imibrowser |
Per-user Professional and Enterprise GUI state. The main GUI configuration is
~/.imibrowser/mibbrowser.xml, and its application log is
~/.imibrowser/log/log.txt.
|
Uninstall a native Linux package with the package manager:
# Debian or Ubuntu
sudo apt remove ireasoning-mibbrowser-enterprise
sudo apt remove ireasoning-mibbrowser-professional

# Fedora, RHEL, Rocky Linux, AlmaLinux, or a compatible distribution
sudo dnf remove ireasoning-mibbrowser-enterprise
sudo dnf remove ireasoning-mibbrowser-professional
Removing Enterprise stops and removes its service and packaged application, but deliberately preserves
/var/lib/ireasoning-mibbrowser and /var/log/ireasoning-mibbrowser. Per-user
~/.imibrowser directories are also preserved. Remove those data directories separately only
when their configuration, logs, license, MIBs, and database are no longer needed. To uninstall a ZIP copy,
stop any manually configured service and delete the directory where the ZIP was extracted.
macOS
| Location | Contents |
|---|---|
/Applications/MIB Browser.app |
Application bundle. Its Contents directory contains the packaged libraries, Java
runtime, documentation, default configuration, MIBs, database files, and launch scripts.
|
~/Library/Containers/com.ireasoning.mibpro/Data/Documents |
Professional GUI data. The main configuration file is config/mibbrowser.xml, and the
application log is log/log.txt; database and MIB data are in sibling directories.
|
~/Library/Containers/com.ireasoning.mibent/Data/Documents |
Enterprise GUI data. The main configuration file is config/mibbrowser.xml, and the
application log is log/log.txt; database and MIB data are in sibling directories.
|
/var/root/Library/Containers/com.ireasoning.mibent/Data/Documents |
Enterprise service state. Its main configuration is config/mibbrowser.xml; related
Trap Receiver and web settings are in the same config/ directory, and the application
log is log/server.log.
|
/Library/Logs/iReasoning/MIB Browser |
Enterprise launch service standard-output and standard-error logs. |
/Library/LaunchDaemons/com.ireasoning.mibent.plist |
Enterprise auto-start service definition. |
For Personal or Professional Edition, quit MIB Browser and move MIB Browser.app from Applications to the Trash. For Enterprise Edition, stop and remove the system service before removing the application:
sudo launchctl bootout system/com.ireasoning.mibent
sudo rm -f /Library/LaunchDaemons/com.ireasoning.mibent.plist
sudo rm -rf "/Applications/MIB Browser.app"
The data under each user's ~/Library/Containers directory and the Enterprise service data under
/var/root/Library/Containers are not removed by those commands. Delete them separately only if
no configuration, license, custom MIB, database, or log data needs to be retained.
Windows
| Location | Contents |
|---|---|
%ProgramFiles%\ireasoning\mibbrowser |
Application files. Important subdirectories include bin for command-line tools,
config for packaged defaults and Enterprise server settings, database,
docs, images, jre, lib, log, and
mibs.
|
%USERPROFILE%\.imibrowser |
Per-user GUI state. The main configuration is mibbrowser.xml, and the GUI application
log is log\log.txt.
|
%ProgramFiles%\ireasoning\mibbrowser\config |
Enterprise Windows service configuration, including mibbrowser.xml,
trapd.xml, and web.properties.
|
%ProgramFiles%\ireasoning\mibbrowser\log\server.log |
Enterprise server application log. |
Uninstall from Settings > Apps > Installed apps by finding iReasoning MIB Browser and
selecting Uninstall. The Start menu also provides
iReasoning > MIB Browser > Uninstall MIB Browser, or run
%ProgramFiles%\ireasoning\mibbrowser\Uninstall.exe. The Enterprise uninstaller stops and
removes its Windows service. Per-user files under %USERPROFILE%\.imibrowser may remain; delete
that directory separately only if its saved configuration and logs are no longer needed.
The MIB Browser interface
Menus
-
File menu
 Load MIB
Open a file chooser and select one or more MIB files. Use your platform's standard multi-select key to select several files at once.
MIB Modules
List properties of all loaded MIB modules.
Server Address (Enterprise Edition Only)
By default, MIB Browser connects to a local server for Trap Receiver and Watch data. Change this address to connect to a remote MIB Browser server.
Open Session
Open a previously saved session file.
Open Graph Data
Open a previously saved graph data file.
Save Session
Save the current open tabs and their settings to a session file so that you can restore them later.
Exit
Exit MIB Browser.
-
Edit menu
Find in MIB Tree
Find a node in the MIB tree.
Find in Result Table
Find a string in the result table.
-
Polls menu
Create polls that retrieve multiple values from SNMP agents and refresh them at a configured interval.
Create Poll
After you create a poll, it appears in the Polls menu. Select it to display its results in a tab in the result pane. Poll Results

-
Operations menu
Get
Send an SNMP GET request to the current agent.
Get Next
Send an SNMP GET-NEXT request to the current agent.
Get Bulk
Send an SNMPv2c or SNMPv3 GET-BULK request to the current agent. This operation is not supported by SNMPv1 agents and will time out when used with one.
Set
Send an SNMP SET request to the current agent.
The SET dialog opens:
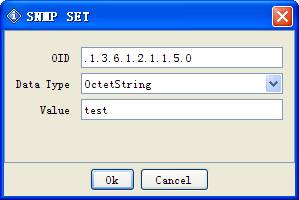
Enter a new value in the Value field, then click OK.
To update several variables, select multiple rows in the result pane before choosing the SET operation.
Note:
1. For the BITS data type, use set notation, such as {1, 3, 8}.
2. A hexadecimal string can be entered as 0x12 0xA1 0x30 or 0x12A130.
Get Subtree
Use SNMP GET-NEXT requests to retrieve the complete subtree from the current agent.
Walk
Perform an SNMP walk on the current agent.
Table View
Show MIB table data.
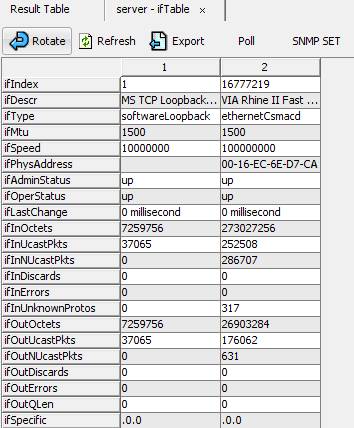
This command opens a Table View window. The OID field must contain a table or entry OID, such as ifTable or ifEntry.
To display only selected columns, select multiple variables from the same table before choosing Table View.
The Table View toolbar provides these actions:
Rotate button
Rotate the table by 90 degrees.
Refresh button
Refresh the table immediately.
Export
Export table data to a CSV file.
Poll button
Refresh table periodically.
SNMP SET
Perform an SNMP SET operation on the selected table cells.
Create Row
Create a row in a table that supports dynamic rows through a RowStatus or EntryStatus column.
Delete Row
Delete the selected row from a table that supports dynamic rows through a RowStatus or EntryStatus column.
Graph
Plot the selected OID. If a graph tab is already open, choose whether to reuse it or open another tab.
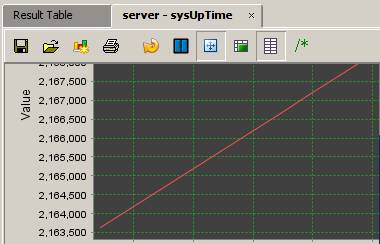
The OID field must contain a numeric scalar, a numeric table column, or a numeric instance, such as sysUpTime, ifOutOctets, or ifOutOctets.1.
Buttons on the toolbar:
Export to CSV file
Export chart data to a CSV file.
Import from CSV file
Import data from a CSV file.
Save as PNG
Save the chart as a PNG image.
Print
Print the chart.
Restart
Restart chart plotting.
Pause
Pause chart plotting.
Switch
Switch between the current and global views.
Display trace
Display trace lines.
Grid
Display grid lines.
Rate
Display rate-of-change values instead of raw values.
Click Set to change the polling interval.
-
Tools menu
Trap Sender
Open the Trap Sender window:
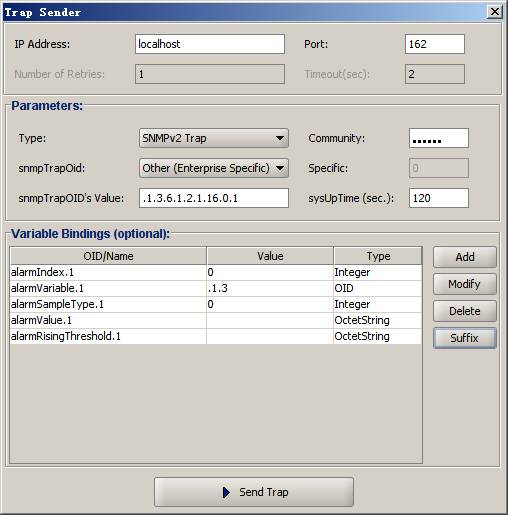
Use this window to send SNMPv1 or SNMPv2c traps and inform requests. Save frequently used settings as a bookmark so that you do not need to enter them again.
For an SNMPv1 or SNMPv2 trap node in the MIB tree, right-click the node and choose Send Trap. MIB Browser opens this window and fills in values from the selected node.
Watches
Display the variables currently being monitored.

Professional Edition

Enterprise Edition
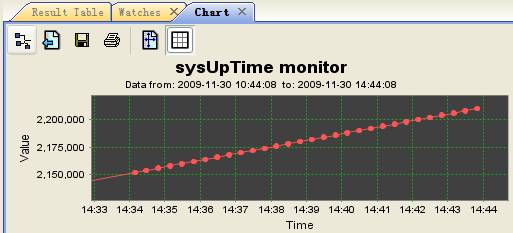
Enterprise Edition: Watch history
Add Watch
Add a Watch item.
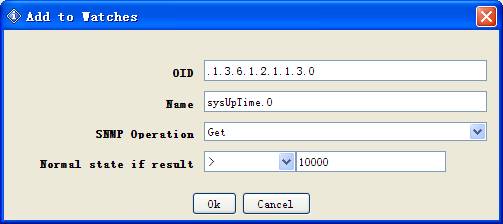
Professional Edition
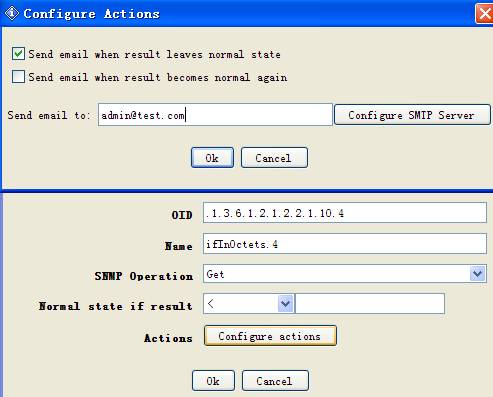
Enterprise Edition
In Enterprise Edition, each Watch can send email or an SNMP trap when it enters an alarm or rearm state.
Run Script
Run commands from a script file.
-
Script file format
- Place each command on its own line.
- Begin a comment line with #.
-
Use GET, GET_NEXT, or SET for SNMP operations.
Supported data-type codes are:GET host[:port] OID-or-name [OID-or-name]... GET_NEXT host[:port] OID-or-name [OID-or-name]... SET host[:port] OID-or-name data-type value [OID-or-name data-type value]...- i: integer; u: unsigned integer; t: TimeTicks
- a: IP address; o: OID; s: string
- c: counter; g: gauge; x: hexadecimal data
get snmp.ireasoning.com sysUpTime get snmp.ireasoning.com sysUpTime sysLocation getnext snmp.ireasoning.com:1611 .1.3.6.1.2.1.1.3.0 set snmp.ireasoning.com sysContact s [email protected] set snmp.ireasoning.com sysContact s [email protected] sysName s Linux -
Use sound or email as an action. The $ symbol represents the result of the previous
query. Supported operators are >, <, =, !=, and err. The
err operator matches a nonzero error status. Configure SMTP before using the email action.
get snmp.ireasoning.com .1.3.6.1.2.1.11500.12.11.0 if $ != 0 sound if $ err sound if $ > 0 email [email protected] -
Pause execution with sleep N, where N is the number of seconds.
sleep 5 -
Save query results with save filename. If the destination exists, MIB Browser appends a numeric
suffix, such as result.txt.1 and then result.txt.2.
save ~/Downloads/result.txt
-
Sample script file
save ~/Downloads/result.txt
get snmp.ireasoning.com sysUpTime
if $ < 1000000 email [email protected]
sleep 5
set snmp.ireasoning.com sysContact s [email protected]
if $ err sound
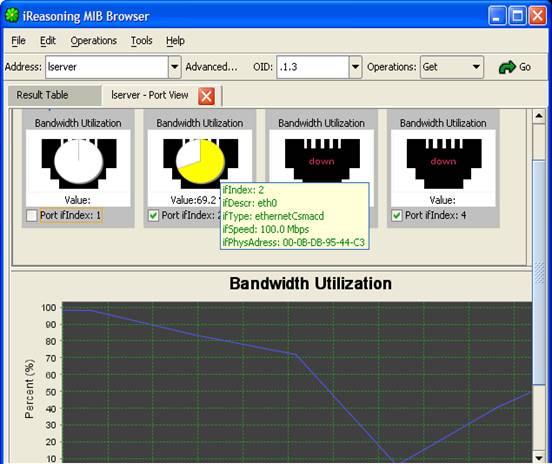
Port View
Display inbound and outbound bandwidth utilization and error percentages for every port on a device. Hover over a chart to see port properties, or clear the checkbox beside a port to exclude it.
Chart colors indicate severity and can be customized in the settings.
Switch Port Mapper
Map devices connected to a managed switch and display bandwidth utilization for its ports.
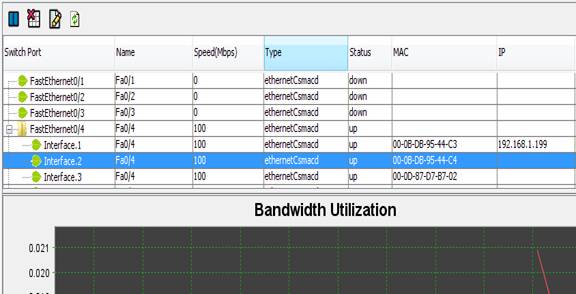
Configure Settings
- Routers : IP addresses and community names for Layer 3 routers used to retrieve MAC-to-IP mappings.
- Chart Polling Interval : The interval used to poll data for charts.
Device Snapshot
Display a snapshot of available device data, including system information, interfaces, disks, processes, and installed software.
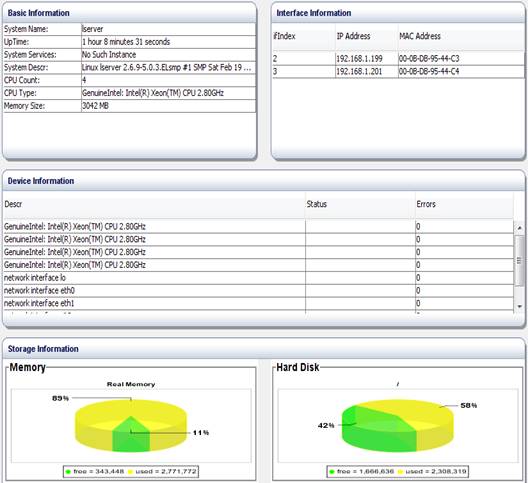 Cisco Device Snapshot
Display a snapshot of a Cisco device.
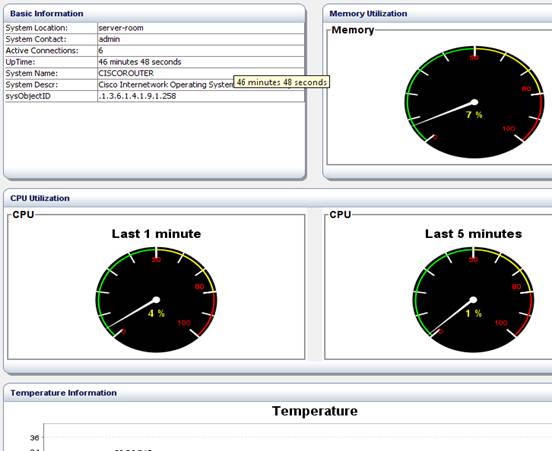
Add more OIDs from the settings window. Their values appear in the Basic Information panel.
Utilization can be displayed as either a meter or a pie chart.
Log Window
Open the application log. To clear it, right-click the pane and choose Clear text.
Ping
Open the Ping tool:
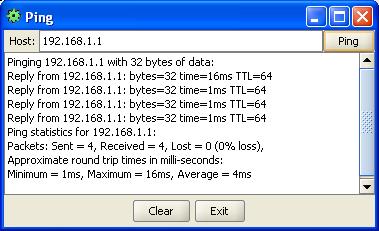
Enter an IP address and click Ping. Results appear in the text area.
Trace Route
Open the Traceroute tool:
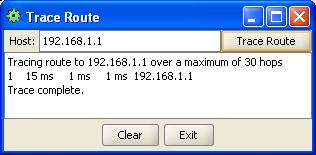
Enter an IP address and click Trace Route. Results appear in the text area.
Network Discovery
Open the network discovery tool:
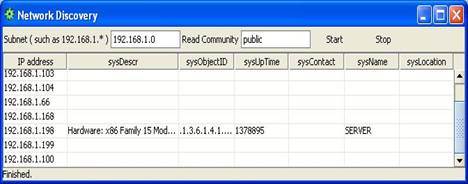
Enter a subnet address, such as 192.168.1.0, and click Start. The tool discovers hosts on the subnet and queries the system table on hosts that run an SNMP agent.
Manage SNMPv3 USM Users
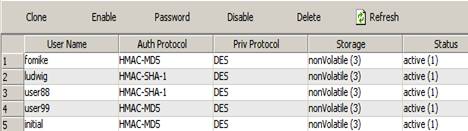
The initial window lists existing SNMPv3 users. Select a user to edit its properties or delete it.
Compare Devices
Compare the SNMP values of two devices:
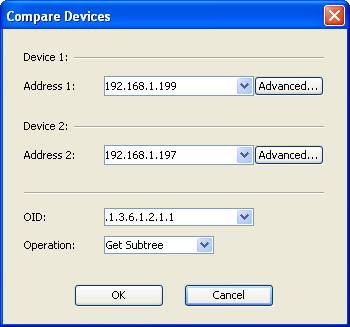
Values that differ between the devices are shown in blue:
 Options
Open the Options window to customize MIB Browser:
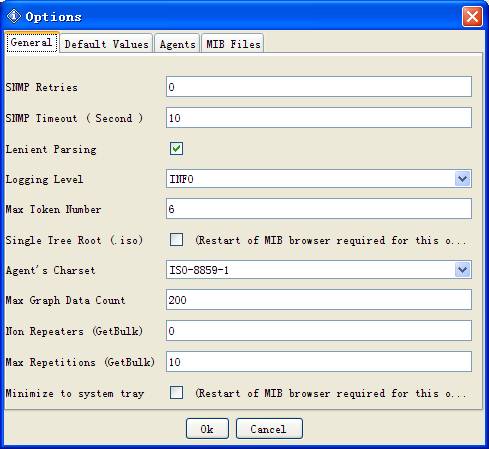 General tab
SNMP Retries
Number of retries for SNMP queries.
SNMP Timeout
Timeout value for SNMP queries, in seconds.
Lenient Parsing
Allow the MIB parser to continue past selected syntax errors in MIB files.
Logging Level
Set the application logging level. DEBUG records SNMP PDUs in the Log window and may reduce performance.
Trap Port
The UDP port on which the Trap Receiver listens.
Max Token Number
Limit the number of OID tokens shown in a Trap Receiver description. For example, when this value is 6, the message ".iso.org.dod.internet.mgmt.mib-2.interfaces.ifTable.ifEntry.ifAdminStatus.3" will be truncated to "mgmt.mib-2.interfaces.ifTable.ifEntry.ifAdminStatus.3".
Single Tree Root
Display all loaded modules under a single .iso root. When disabled, each MIB module has its own root. Restart MIB Browser after changing this option.
Agent's Character Encoding
Select the character encoding used to display values from agents that do not use the default Western encoding.
Max Graph Data Count
The maximum number of graph data points kept in memory.
Non Repeaters
The non-repeaters value used in SNMP GET-BULK requests.
Max Repetitions
The max-repetitions value used in SNMP GET-BULK requests.
Minimize to system tray
Minimize MIB Browser to the system tray instead of exiting when its window is closed.
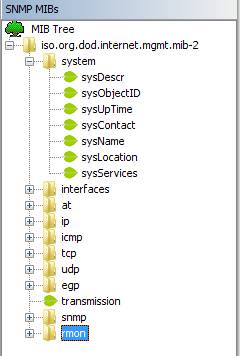
Single tree root
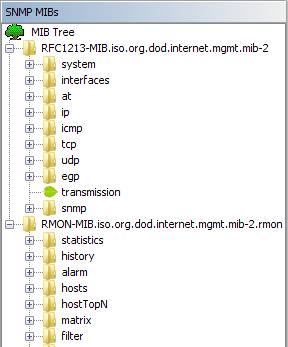
Each module has its own root node
Default Values tab
Set the default properties used for new SNMP agents.
Agent tab
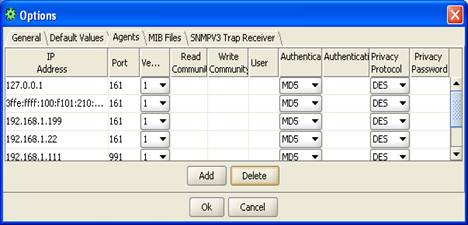
This table stores properties for previously visited SNMP agents. You can add or remove agents.
For SNMPv1 and SNMPv2c agents, the user, authentication, and privacy fields are ignored. For SNMPv3 agents, the read and write community fields are ignored.
MIB Files tab
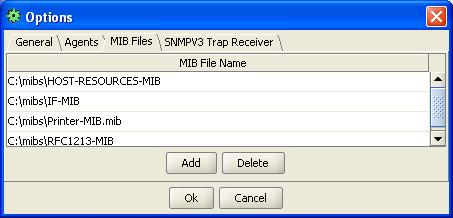
This table stores loaded MIB file names. You can add or remove files.
-
-
Bookmarks menu
This menu contains saved bookmarks. A bookmark links an OID to an operation, allowing you to repeat a frequently used task by selecting its name instead of entering it again.
-
Expressions menu
This menu contains predefined and custom expressions. An expression combines values from one or more MIB object instances to calculate a metric, such as network throughput.
Each expression contains one or more named variables with associated OIDs. When a variable's OID ends with a period, MIB Browser queries every instance of that OID, similarly to a Get Subtree operation.
Variables that represent counters may use delta values instead of raw values. MIB Browser then runs two queries, 10 seconds apart by default, and uses the difference between the results.
Toolbar

- Address field
Enter the SNMP agent's IP address and optional port in the form ipAddress@port or ipAddress:port for IPv4. Omit the port when using the default port, 161.
-
Address Group
contains multiple IP addresses and optional port numbers. Enter g followed by a space in the address field to use a group. For example:
192.168.1.1, 192.168.1.2:1611, 192.168.2.1
The group dialog does not configure community names or SNMPv3 parameters. To edit those properties, enter an individual address in the Address field and click Advanced. Address Groups automatically use the saved properties for that agent.
-
Advanced button
Configure the current SNMP agent, including community names and SNMPv3 USM parameters.
For an SNMPv3 agent, MIB Browser updates its engine ID, authentication key, and privacy key after the first successful query.
-

Enter the object identifier for an SNMP query. Selecting a MIB tree node or result-table row updates this field automatically, and you can also enter an OID directly.
-
Operations
Select an SNMP operation. The operation runs immediately when selected.
-
Go button
Run the selected operation.
MIB tree pane
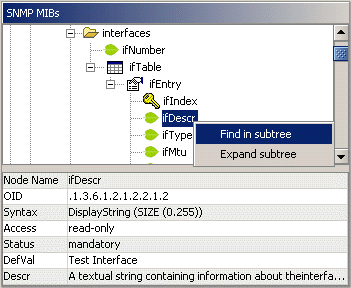
The MIB tree area contains the tree pane at the top and the properties pane at the bottom.
-
Tree Pane
The tree pane displays loaded MIB modules. Right-click a module root to use Find, Expand, or Unload MIB. Other nodes provide Find and Expand.

Table node

Table entry node

Read-write node

Read-create node

Index node

Leaf node, usually read-only
Table: Icon descriptions
Double-click a scalar node to query its value from the agent shown in the toolbar. Double-click a table node, such as ifSpeed, to query its subtree.
-
Node Properties Pane
Display properties for the selected node. Hover over values in the second column for more information.
Result pane
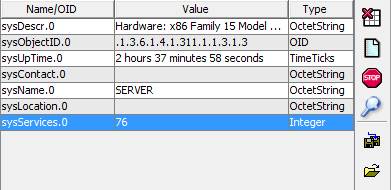
Query results appear in a table. If an octet string is shown in hexadecimal format, double-click it to switch display modes.
Buttons on the right toolbar:
|
Stop button |
Stop pending SNMP queries. |
|
Clear Table button |
Clear the result table. |
|
Raw Data button |
Open a dialog that shows the raw SNMP query results. |
|
Find button |
Find strings in the result pane. |
|
Save button |
Save values from the result pane to an XML file. |
|
Open button |
Load values from an XML file into the result pane. |
Trap Receiver
Main window
Open the Trap Receiver from MIB Browser, or start it as a standalone window.
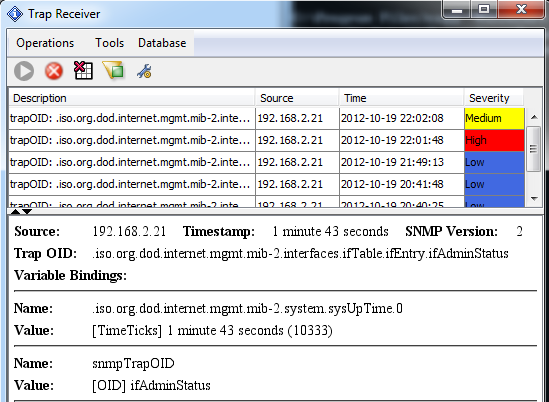
The upper pane lists received traps. Select a trap to view its details in the lower pane.
| Column | Description |
|---|---|
| Description | A summary of the received trap. |
| Source | The IP address of the device that sent the trap. |
| Time | The date and time when the Trap Receiver received the trap. |
| Severity | The trap's assigned severity: Low, Medium, or High. |
| Ack | Indicates whether the trap has been acknowledged. |
| Trap Receiver controls | |||||||||||||||||||||||||||
|---|---|---|---|---|---|---|---|---|---|---|---|---|---|---|---|---|---|---|---|---|---|---|---|---|---|---|---|
|
Trap Filter button |
Filter received traps by source IP address or trap OID. |
||||||||||||||||||||||||||
|
Start Trap Receiver button |
Start listening for traps. The button is disabled while the Trap Receiver is running. Opening the window does not start the receiver automatically. |
||||||||||||||||||||||||||
|
Stop button |
Stop listening for traps. |
||||||||||||||||||||||||||
|
Add Trap Rule |
Add a rule for processing traps. When a trap is selected, MIB Browser pre-fills applicable fields with data from that trap. MIB Browser evaluates all applicable rules unless one marks the trap as ignored. Rules run in name order, so renaming a rule changes its position. For example, if rules A and B match the same trap and set different severities, B runs after A and determines the final severity. |
||||||||||||||||||||||||||
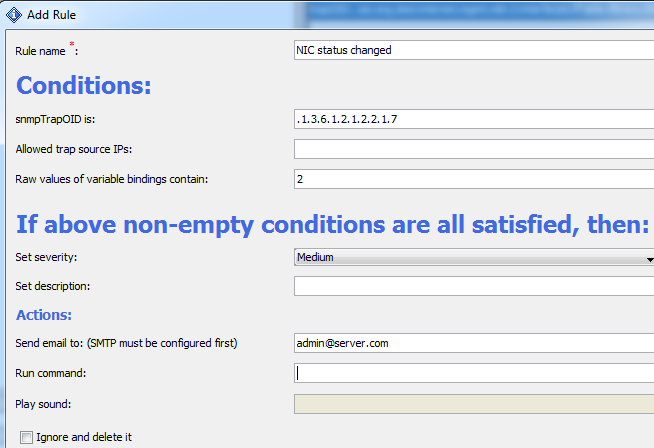
Rule conditions
Rule actions
Suppression tabSuppression provides a cancellation window before a rule performs external actions. It is useful when a second, related trap reports that a problem has cleared, or when an operator acknowledges the original trap before notifications and automated actions should run. To configure suppression for a rule:
During the delay window, sound, rule-generated email, command execution, SNMP requests, and outgoing trap actions are held. If the window expires without cancellation, the actions run once. The rule's severity and description changes are applied immediately because they describe the received trap rather than perform an external action. System-wide email forwarding: When Enable forwarding traps via email is selected in SMTP settings, a trap that matches a suppression-enabled rule also delays the system-wide email. This works even when the rule has no action selected on its Actions tab. If the original trap is acknowledged or a related trap matches during the window, the system-wide email is not sent. A related trap that cancels pending work is treated as a clearing event and does not trigger external actions of its own during that evaluation. If several suppression-enabled rules match the same trap, each rule's own actions use its configured delay. The single system-wide email waits for the longest applicable delay and is cancelled when any applicable rule's cancellation condition is met. Traps that do not match a suppression-enabled rule continue to use immediate system-wide email forwarding. | |||||||||||||||||||||||||||
|
Manage Rules |
Edit or delete existing rules. |
||||||||||||||||||||||||||
|
Clear Table button |
Remove all rows from the trap table. |
||||||||||||||||||||||||||
|
Export Table to CSV |
Export table data to a CSV file. |
||||||||||||||||||||||||||
|
Options |
Open the Trap Receiver settings. |
||||||||||||||||||||||||||
Options
-
General tab
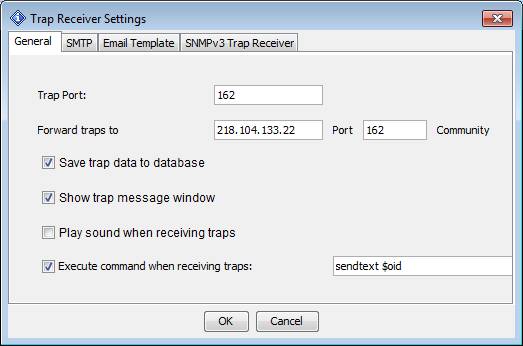
Trap Port
The UDP port on which the Trap Receiver listens.
Forward Trap To
Forward received traps to another receiver as SNMPv1 PDUs.
Save trap data to database
Store received traps in the bundled database so that they can be loaded again later.
Show trap message window
Display a notification near the system tray when a trap arrives.
Play sound
Play sound when a trap is received.
Execute command
Execute a command when a trap is received.
Tokens used in execute command $ip
IP address of the trap source
$severity
Severity as configured in the trap rule
$description
Description as configured in the trap rule
$oid
Trap OID
$ts
Timestamp value
$sp
Value of the SNMPv1 trap-specific field
$vb.all
All variable bindings
$vb.n
The nth variable binding. For example, $vb.1 is the first binding and $vb.2 is the second.
-
SMTP tab
Use this tab to send received traps to one or more email addresses. The primary SMTP server is required when forwarding is enabled. A configured secondary server is used automatically if delivery through the primary server fails. The primary and secondary servers can use different authentication methods and different OAuth accounts.
To enable system-wide trap email forwarding, select Enable forwarding traps via email and enter one or more addresses in To Email Accounts. Separate multiple addresses with commas or semicolons. Then configure the primary server using one of the following modes.
SMTP authentication modes Username and password Leave Use OAuth unselected. Enter the SMTP host, sender address, username, password, and the transport security required by the mail server. Use either Enable SSL/TLS or Enable STARTTLS, not both. If the server permits unauthenticated SMTP, leave both User Name and Password empty. OAuth 2.0 Select Use OAuth. The legacy host, From, username, password, and security controls are hidden and the provider, email, authorization status, and OAuth actions are shown instead. Saved legacy values are preserved if you later turn OAuth off. Configure OAuth 2.0
- In the Primary SMTP Server section, select Use OAuth.
- Select GMail or Outlook, and enter the mailbox address in Email. This address is used as both the SMTP account name and the sender's From address. The SMTP host and transport security are configured automatically; no client ID or client secret is requested.
- Click Authorize in Browser, sign in to the selected account, and grant the requested mail access. Complete the browser flow within five minutes. After the browser reports that authorization is complete, return to MIB Browser. MIB Browser displays an OAuth Authorized message and the status changes to Connected.
- Click Apply or OK to save the authorization. This is required for OAuth mail to continue working after MIB Browser is restarted.
- Optionally repeat these steps in Secondary SMTP Server. Its provider and account are independent of the primary server.
Provider Automatic SMTP settings Authorization notes GMail smtp.gmail.com using SSL/TLS Sign in with the Google Workspace or Gmail account entered in the Email field and approve Gmail mail access. Outlook smtp-mail.outlook.com:587 using required STARTTLS Sign in with the Microsoft 365, Outlook.com, or Hotmail account entered in the Email field. An organization administrator may need to approve access and enable SMTP AUTH for the mailbox. Browser callback and local port: During authorization, MIB Browser temporarily listens only on the loopback interface and asks the operating system for an available high-numbered port. It does not bind to port 80 and is not reachable from other computers. Google returns to a temporary 127.0.0.1 callback; Microsoft returns to a temporary http://localhost:<port> desktop callback. The listener stops after authorization or after the five-minute timeout. If the system browser cannot be opened, MIB Browser displays a copyable authorization URL that can be opened manually on the same computer.
MIB Browser stores the renewable authorization securely and keeps short-lived access tokens only in memory. Access tokens are refreshed automatically before they expire. The saved authorization remains available after an application restart, allowing MIB Browser to obtain a new access token when mail is next sent. Use Disconnect to clear the saved OAuth authorization. Changing the provider or Email field also requires authorization again; click Apply or OK afterward to save the change.
Send a test message
- Click Send test mail, enter the destination in Send email to, and click OK.
- The modal Sending Test Mail dialog displays a spinner while delivery is in progress, then reports a result for the primary server and for the secondary server when one is configured.
- Click Close to dismiss the dialog. Closing it while the spinner is active does not cancel the SMTP operation.
Test mail verifies each configured server separately. Normal trap forwarding first uses the primary server and falls back to the secondary server if the primary attempt fails. OAuth or password values are not shown in SMTP logs.
Troubleshooting OAuth: If authorization is denied, times out, or reports a provider error, verify the entered email address, retry Authorize in Browser, and check that a proxy or firewall is not blocking Google or Microsoft sign-in and token endpoints. For Outlook, also verify that SMTP AUTH is enabled for the mailbox. A local port conflict does not normally require configuration because a free port is selected for every authorization attempt.
When rule suppression is enabled, system-wide trap email can be delayed and cancelled together with rule actions. See the Suppression Tab section.
-
Email Template tab Enterprise Edition only
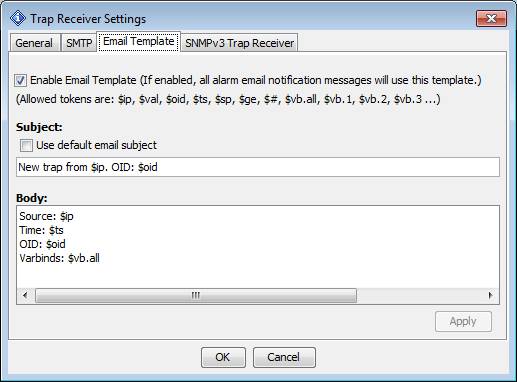
When enabled, this template is used for every email sent by the Trap Receiver.
Tokens used in template $ip
IP address of the trap source
$oid
Trap OID
$ts
Timestamp value
$sp
Value of the SNMPv1 trap-specific field
$trap
The complete trap message in HTML format, as displayed in the lower Trap Receiver pane.
$vb.all
All variable bindings
$vb.n
The nth variable binding. For example, $vb.1 is the first binding and $vb.2 is the second.
-
SNMPv3 Trap Receiver tab
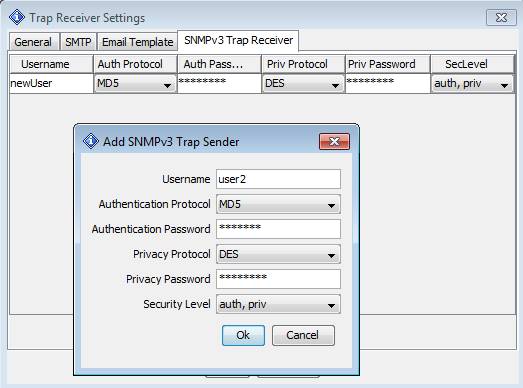
This table stores properties for SNMPv3 trap senders. You can add or remove senders.
Command-line tools
Command-line tools are located in $INSTALL_DIR\bin.
-
Launch MIB Browser from a terminal with these options:
browser.bat -h (or -help, -?)
Display command usage.
-h <h>
Set the SNMP agent's host name or IP address.
-p <p>
Set the SNMP agent port. The default is 161.
-v <1|2|3>
Set the SNMP version to 1, 2, or 3.
-c <c>
Set the SNMP community name. The default is public.
-o <o>
Set the OID.
-a <a>
Set the operation to get, getnext, getsubtree, walk, or gettable.
-f <filename>
Set the output CSV file name for the gettable operation.
-s <filename>
Open a saved session on startup.
-w
Open the Watches tab at startup.
-
Command-line graph tool
Use graph.bat to record SNMP agent values in a file. Open the resulting file in MIB Browser by choosing File > Open Graph Data.
Run graph.bat without arguments to display usage information and examples.
-
Command-line SNMP tools
snmpget.bat sends an SNMP GET request.
snmpgetnext.bat sends an SNMP GET-NEXT request.
snmpset.bat sends an SNMP SET request.
trap.bat sends an SNMP trap.
Keyboard shortcuts
|
Ctrl-L |
Load a MIB file. |
|
Ctrl-F |
Find a MIB node. |
|
Ctrl-G |
Run an SNMP GET operation. |
|
Ctrl-N |
Run an SNMP GET-NEXT operation. |
|
Ctrl-E |
Run a Get Subtree operation. |
|
Ctrl-S |
Run an SNMP SET operation. |
|
Ctrl-W |
Run an SNMP walk. |
|
Ctrl-P |
Stop current operation. |
|
Enter |
When the Operations list or Go button has focus, press Enter to repeat the last operation. |
|
Ctrl-T |
Open Table View. |
|
Ctrl-R |
Plot a graph. |
|
Ctrl-D |
Add to Watches. |
|
Ctrl-O |
Open the Watches pane. |
|
Ctrl-I |
Open the Trap Receiver pane. |
Choose an edition
Personal Edition is free for private use on one workstation. You may redistribute the complete package for private use, but you may not use this edition for commercial or professional work.
Professional Edition adds management and monitoring features and is licensed for commercial or professional use.
Enterprise Edition adds service-based operation, advanced Trap Receiver capabilities, and enhanced monitoring.
Feature comparison
| Feature | Personal Edition | Professional Edition | Enterprise Edition |
|---|---|---|---|
|
Runs on Windows, macOS, Linux, and other UNIX platforms |
|
|
|
|
Supports basic SNMP operations |
|
|
|
|
Table view for MIB tables |
|
|
|
|
SNMPv3 USM user management |
|
|
|
|
Trap Receiver |
|
|
|
|
Trap Sender |
|
|
|
|
Supports IPv6 |
|
|
|
|
Supports SNMPv1/v2c |
|
|
|
|
Supports loading any standard or private MIB |
|
|
|
|
Maximum number of loaded MIBs |
10 |
No restrictions |
No restrictions |
|
Free |
|
||
|
Supports SNMPv3 |
|
|
|
|
SNMP expressions |
|
|
|
|
Watches |
|
|
|
|
Address Groups |
|
|
|
|
Network discovery |
|
|
|
|
ICMP Ping tool |
|
|
|
|
ICMP Traceroute tool |
|
|
|
|
Performance graph |
|
|
|
|
Port view |
|
|
|
|
Switch port mapper |
|
|
|
|
Device snapshot |
|
|
|
|
Cisco device snapshot |
|
|
|
|
Device comparison |
|
|
|
|
Trap forwarding by email |
|
|
|
|
Periodic MIB table refresh |
|
|
|
|
Dynamic table-row creation and deletion |
|
|
|
|
Rule engine for processing traps |
|
|
|
|
Run the Trap Receiver and Watches as a service |
|
||
|
Watch actions |
|
||
|
Email template |
|
